*This post may contain affiliate links for which I earn commissions.*
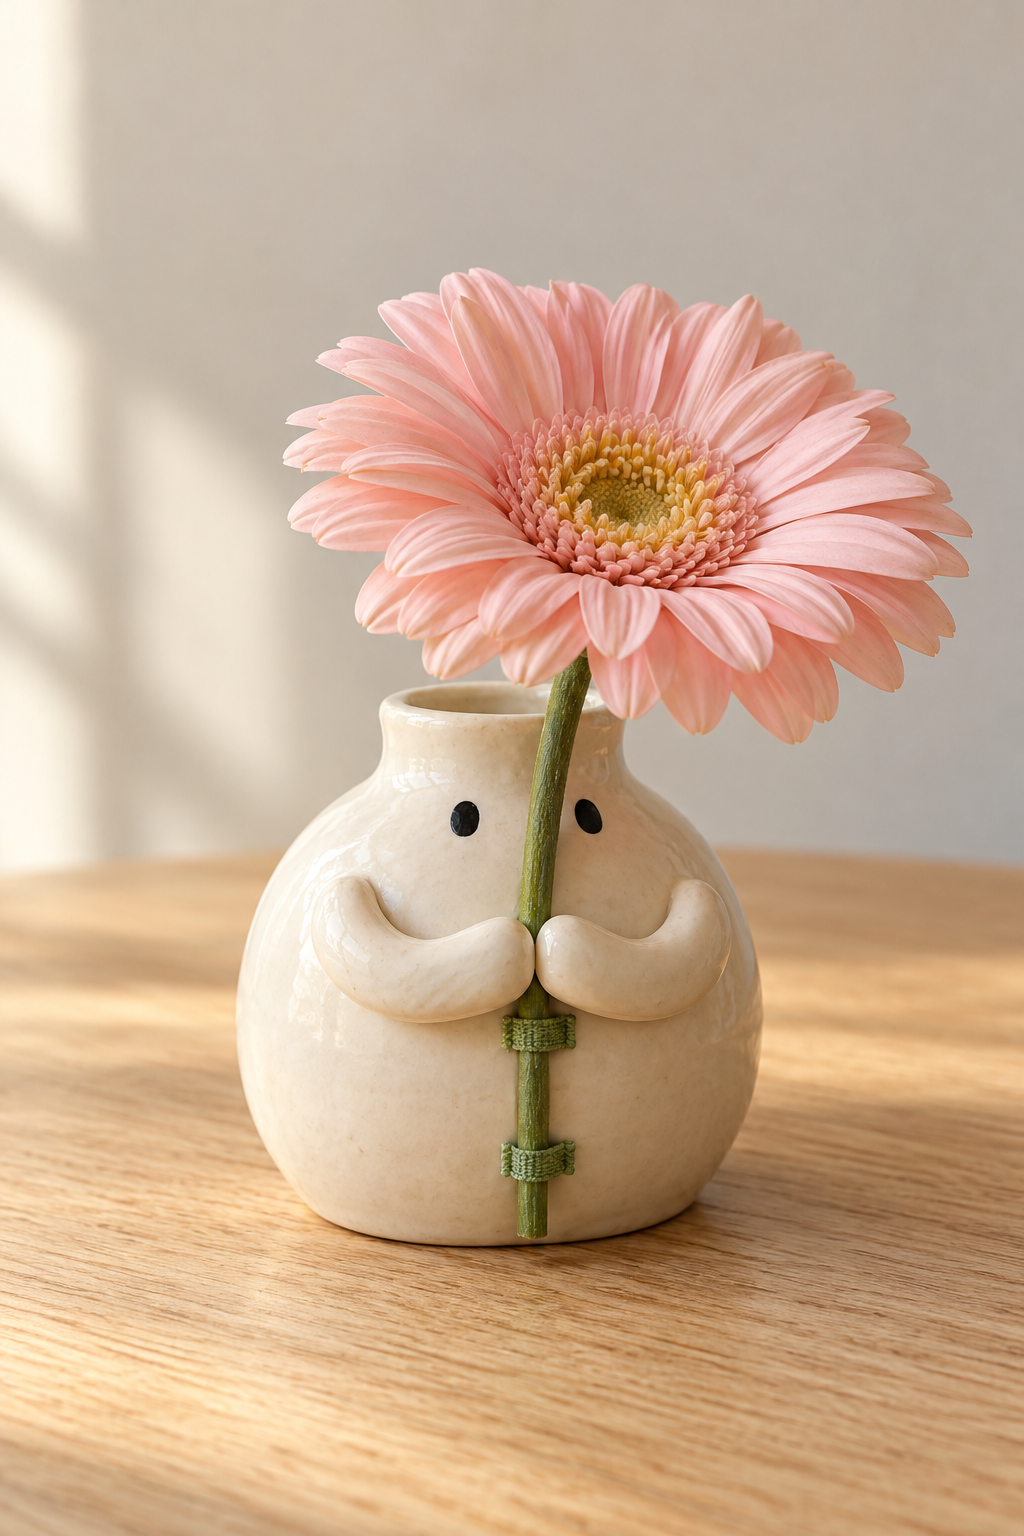
This image was created with AI to offer inspiration for the project below. The tutorial proposes a practical way to recreate the look with a ready-made vase, separately formed clay arms, and a lightweight artificial flower.
A flower almost too big for its vase, two eyes peeking beneath the petals, and a pair of little arms wrapped around the stem. This small desk decoration gets its personality from that one affectionate gesture.
What You’re Making
Start with a small ivory or white ceramic bud vase, then add two black eyes and a pair of rounded clay arms. A large blush pink faux gerbera sits above the vase, with its stem running down the front between the eyes and hands. Two small green cotton tape loops hold the stem in place, so the clay arms do not have to support the flower. Leave the vase empty and use the finished piece as a dry decoration.
The inspiration image shows a glossy ivory vase; the linked white vase offers a matte alternative.
The downloadable guide supplies two eye shapes, separate left and right arm references, and front and side placement drawings. It is a face-and-arm guide, not a pattern for making a vase.
Materials and Supplies
Main Materials
- Small ivory or white ceramic bud vase, about 3 inches tall and wide, with a flat base. For a white version, use the shortest, roundest vase in the Tanvecle five-piece set.
- One lightweight pink artificial gerbera, with a bloom about 4 to 4 1/2 inches across and a bendable green stem. Choose the lighter pink flower from the linked mixed-color set.
- White air-dry clay for two decorative arms and a small test piece.
- Acrylic craft paint matched to your vase, in warm ivory or white.
- Pale beige acrylic craft paint, optional, for a speckled finish.
- Acrylic varnish suitable for painted air-dry clay, with a matte or gloss finish to match your vase.
- Black self-adhesive craft vinyl for the eyes.
- Green cotton twill tape, approximately 1/4 inch wide, for two stem keeper loops.
- Clear contact adhesive compatible with ceramic, fabric, and the chosen dried clay.
- Plastic food wrap for the release layer.
- Printer paper you already have and low-tack tape for planning and temporary supports.
Tools
- Measuring tape or ruler.
- Scissors for paper, vinyl, and cotton tape.
- Wire cutters suitable for the artificial stem.
- Small paintbrush and a rounded clay shaping tool.
- Fine sandpaper and a soft dusting brush (use a clean, dry brush from your paintbrush set).
- Printer for the downloadable guide (your home printer is fine).
- Protective work mat, safety glasses, and disposable gloves for painting. Follow the adhesive manufacturer’s glove recommendations when gluing.
Before You Start
Choose the flower and vase together
Choose a lightweight artificial gerbera with a bloom about 4 to 4 1/2 inches across, slightly wider than the vase body. Hold it above the vase before buying other supplies if possible. Both eyes should remain visible beneath the petals, with the flower’s center positioned above the vase’s base rather than leaning far to one side.
Choose a substantial ceramic vase with a flat, non-rocking base. If the mock-up tips or feels precarious, shorten the exposed stem, reduce its sideways lean, or choose a heavier, wider-based vase. Don’t expect the clay arms to stabilize a top-heavy arrangement.
Allow time between sessions
Budget roughly 90 to 120 minutes of hands-on work, spread over several sessions, plus drying and curing. As one manufacturer example, Crayola says its air-dry clay generally needs about 72 hours to dry completely; thickness and room conditions can change that. Paint, varnish, and adhesive add their own waiting periods. Follow the directions for the products you actually use.
Make a small clay test piece alongside the arms. After it dries, test the paint and varnish on it, and test a bare clay contact patch against a discreet area of the vase with your adhesive. Proceed only if the cured bond is sound and the glaze remains intact. The same adhesive must also be suitable for cotton tape on ceramic. Work with ventilation and the protective equipment specified on its label.
Step-by-Step Tutorial
1. Plan the expression and the stem path
Download the Flower-Hugging Vase Face and Arm Guide. Print the three US Letter pages at Actual Size or 100%, with scaling disabled. On A4 paper, center the pages at 100% rather than choosing Fit. Measure the one-inch square before using the shapes.
Wash and thoroughly dry the vase. Remove dust, grease, and any temporary labels from the bonding areas without scratching the glaze. Cut out the paper eye shapes and use tiny pieces of low-tack tape to preview them. Start with the eye centers about 3/4 inch apart and 2 3/8 inches above the tabletop, then adjust to the actual vase and flower.
Hold the stem slightly to the right of center, outside the vase. Position the bloom so its lower petals hover above the eyes. Mark the shoulder contacts around 2 inches high, the hands around 1 5/8 inches, and the two keeper loops around 1 1/4 and 1/2 inch high. These are starting positions, not drilling or cutting measurements.
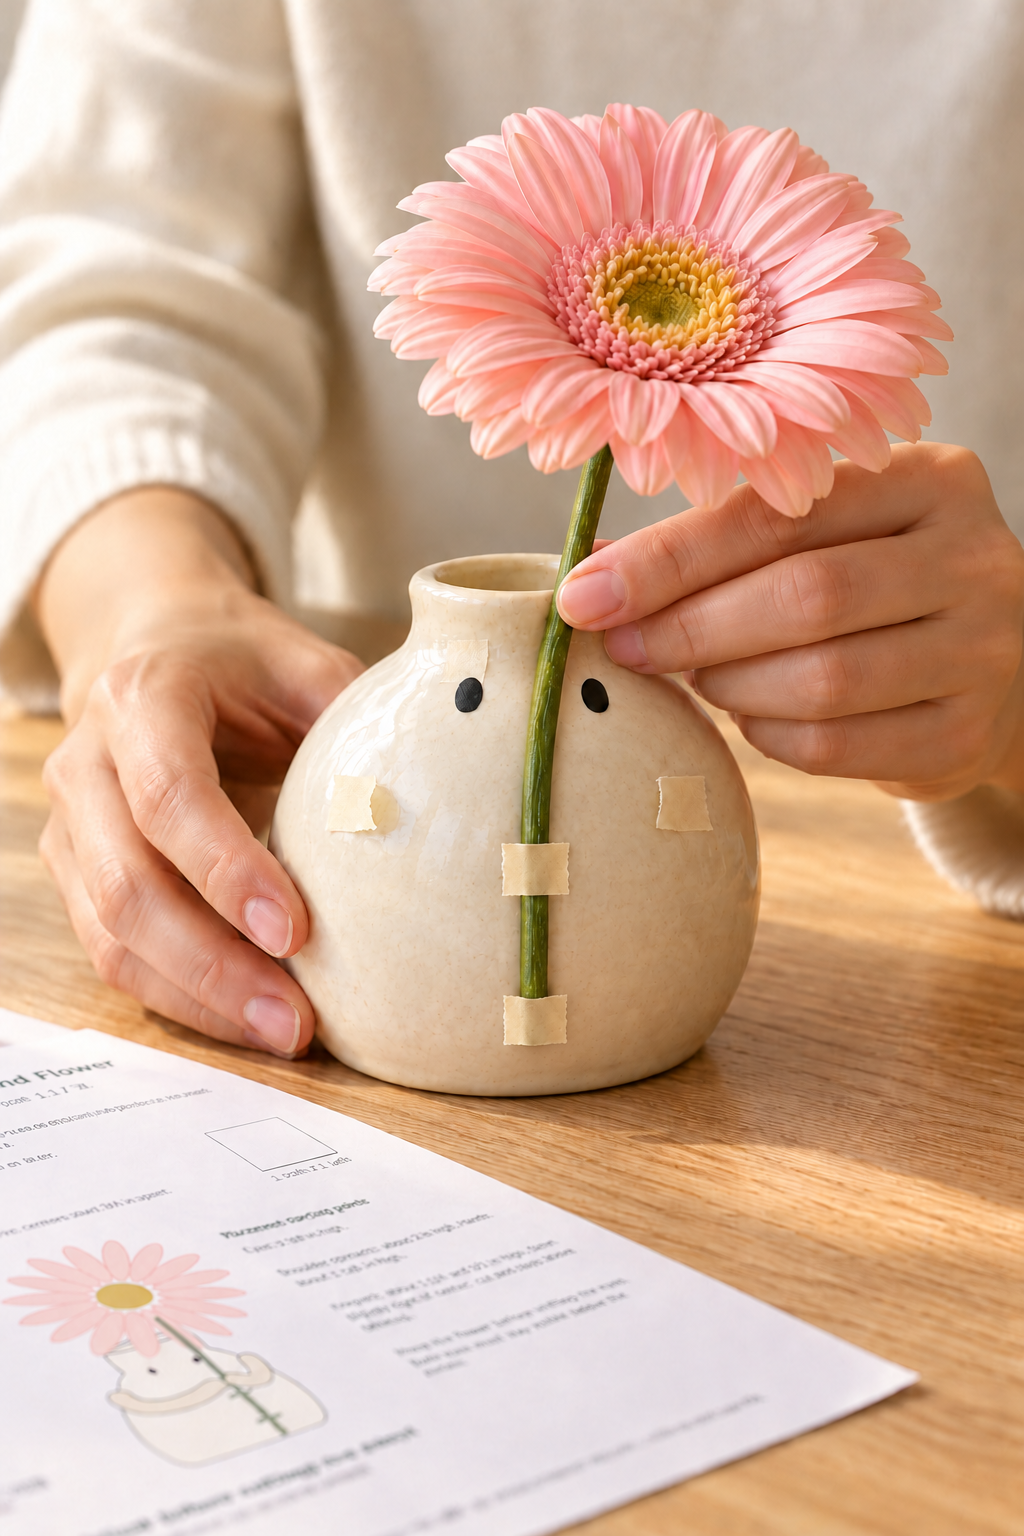
Check the pose from the front. If a petal hides an eye, move the bloom upward or change its tilt before moving the face. Keep the stem’s cut end above the tabletop. Take a quick reference photo of the arrangement, then remove the flower and planning pieces.
2. Add the simple eyes
Trace the two printed ovals onto black self-adhesive vinyl. The reference eyes are about 1/8 inch wide and 3/16 inch high. Cut them with scissors, peel the backing, and press them onto the clean vase at the planned positions. Leave off a mouth and cheeks so the flower and embracing arms remain the focus.
3. Shape two arms against a protected curve
Lay the vase securely on its back in a cradle of folded paper, over your work mat. Cover the front and sides with a smooth release layer of plastic wrap. Roll two clay ropes, starting around 2 1/8 inches long and 3/8 inch thick. Keep a little extra clay available because the curve, hand size, and drying shrinkage determine the final fit.
Use the left and right outlines on page 2 as shape references. Flatten each shoulder into a broad contact patch, curl the arm toward the front, and round its inner end into a mitten without individual fingers. The arms should form shallow upward-opening curves.
Place a plastic-wrapped section of the actual flower stem between the hands while shaping. Curve the rounded hands toward each other so they appear to hug the stem, with their tips nearly meeting in the front view. Leave a clear vertical passage behind the fingertips for the stem to slide through. Keep the arms separate, and do not close either hand into a ring around the stem. Support each forearm with a small folded piece of paper to prevent sagging.
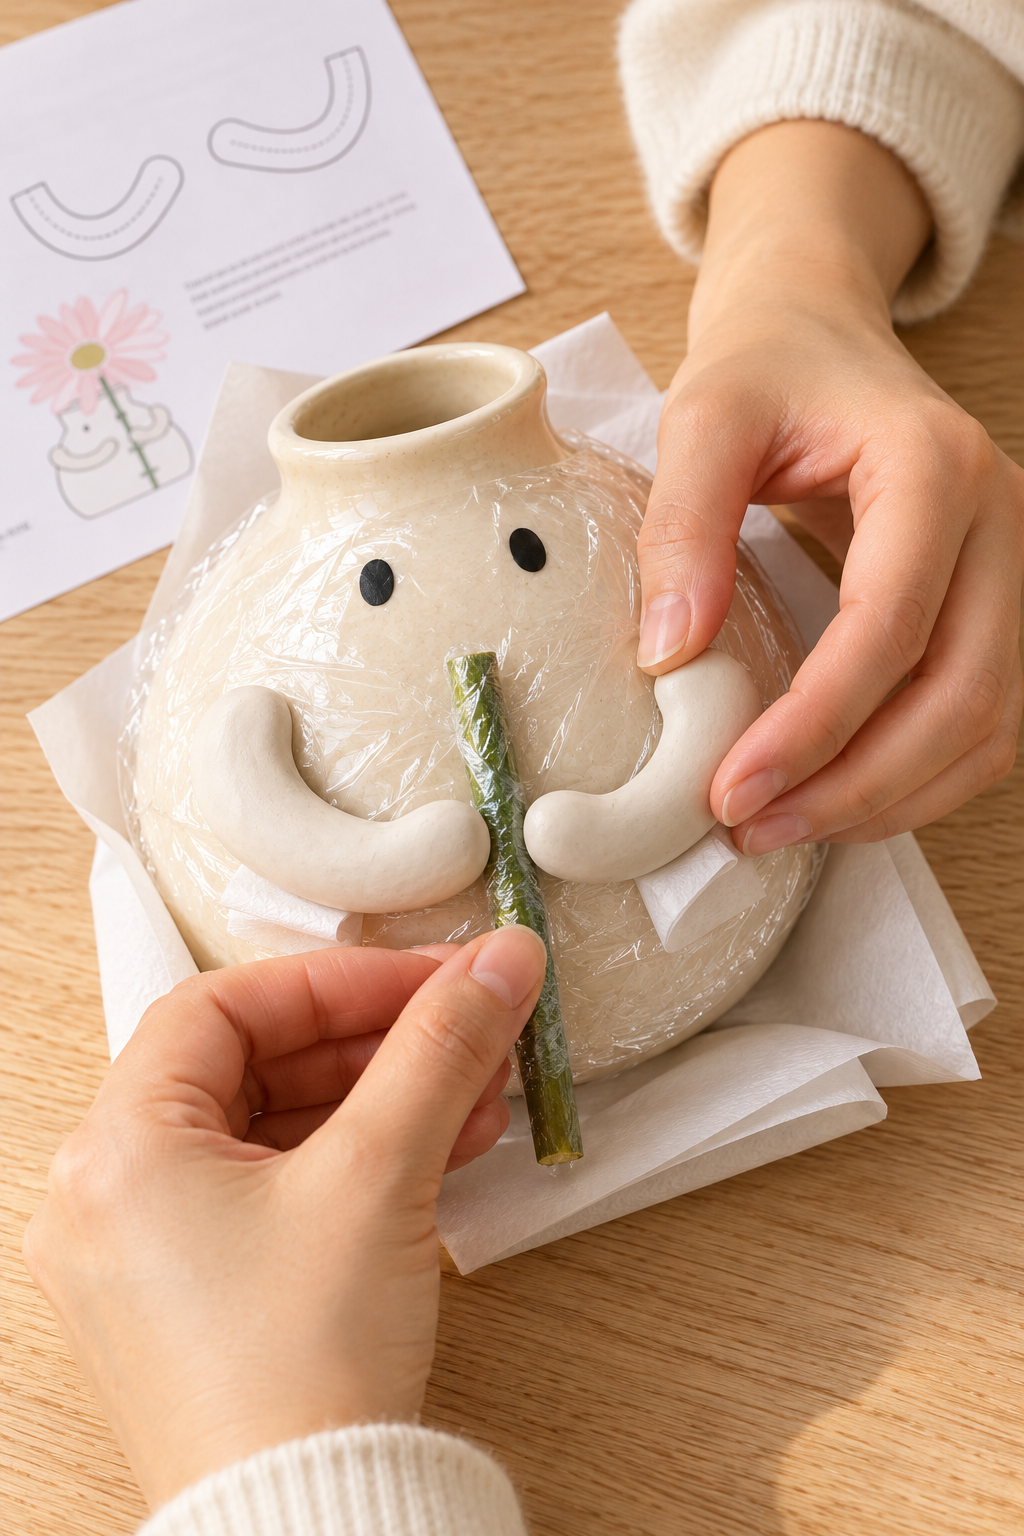
When the clay is firm enough to lift without distorting, remove the stem gauge and carefully release the arms. Continue drying them separately on a supported surface, turning them gently when firm enough so the undersides can dry. Do not leave them locked around the vase or stem as they shrink. Follow the clay manufacturer’s drying instructions; never force a bend into a dry arm.
4. Finish and attach the dry arms
Dry-fit both arms once they are fully dry. Each shoulder needs a broad, close-fitting contact area on the vase, and the two hands must leave space for the stem. If shrinkage creates a large gap, remake the affected arm rather than filling the gap with extra glue. Clear contact adhesive is not a substitute for a well-fitting joint.
Lightly smooth rough edges, brush away dust, and paint the visible arm surfaces to match your vase’s ivory or white color. If your vase has subtle speckles, lightly dab beige paint onto the arms with a nearly dry brush, mixing in a little white if needed. Finish with a compatible varnish, choosing matte for a matte vase or gloss for a glossy one. Keep the shoulder bonding patches bare, and let each coating dry or cure according to its label.
Apply your tested adhesive to the bare shoulder patch and its matching ceramic area. If using Gorilla Clear Grip, its directions call for adhesive on both surfaces, an approximately two-minute wait before pressing them together, and at least 24 hours for full cure. Other adhesives may need a different sequence. Support each arm gently while the bond cures, without putting tape on fresh finishes.
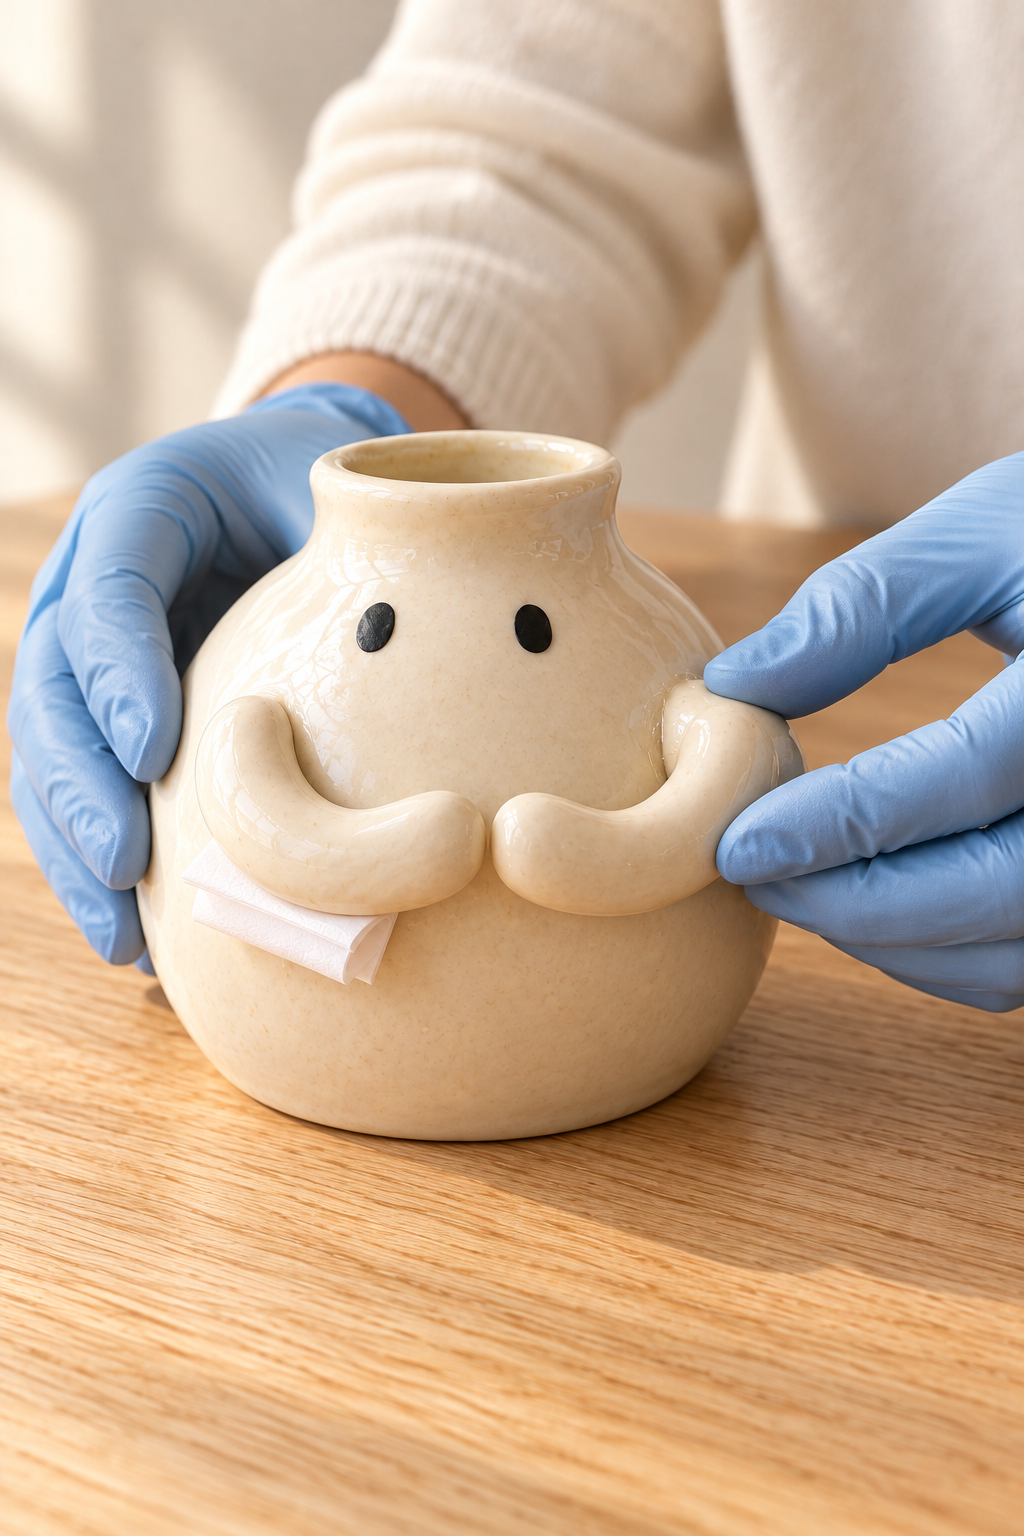
At this stage the flower and green keeper loops are still absent. The arms should hold their shape, with the fingertips nearly meeting in front of the open stem passage.
5. Make the two independent stem keepers
Cut two short pieces of green cotton twill tape. For each keeper, leave a small raised center bridge that fits snugly over the actual stem and a flat bonding tab on each side. Start with about 1 inch of tape per piece, adjusting to leave roughly 3/8 inch of flat tab on either side of the narrow bridge.
Use the actual stem to size each loop, then set it aside. Apply adhesive only to the flat tabs and their matching areas on the vase, following the product’s directions. Keep the center of each loop free of glue.
To keep the openings from flattening while the adhesive cures, support each one with a small removable spacer sized to the stem. A small piece of paper rolled to the stem’s thickness and covered with smooth plastic wrap can serve as the spacer. Keep the spacers clear of the adhesive so they can slide out without pulling on the tabs. Once the bonds have fully cured, gently remove them.
This method avoids relying on adhesion to an unknown plastic stem coating. The upper keeper resists sideways movement; the lower one helps control the stem near the bottom. The snug cotton bridges provide grip, but you still need to check the actual stem for slipping.
6. Slide in the flower and check the balance
Trim the stem with suitable wire cutters, wearing safety glasses. Leave its end above the tabletop. With both keeper bonds fully cured, feed the cut end downward through the open space between the hands, then through the upper and lower cotton tunnels. Support the flower as you slide the stem through, keeping pressure off the clay hands.
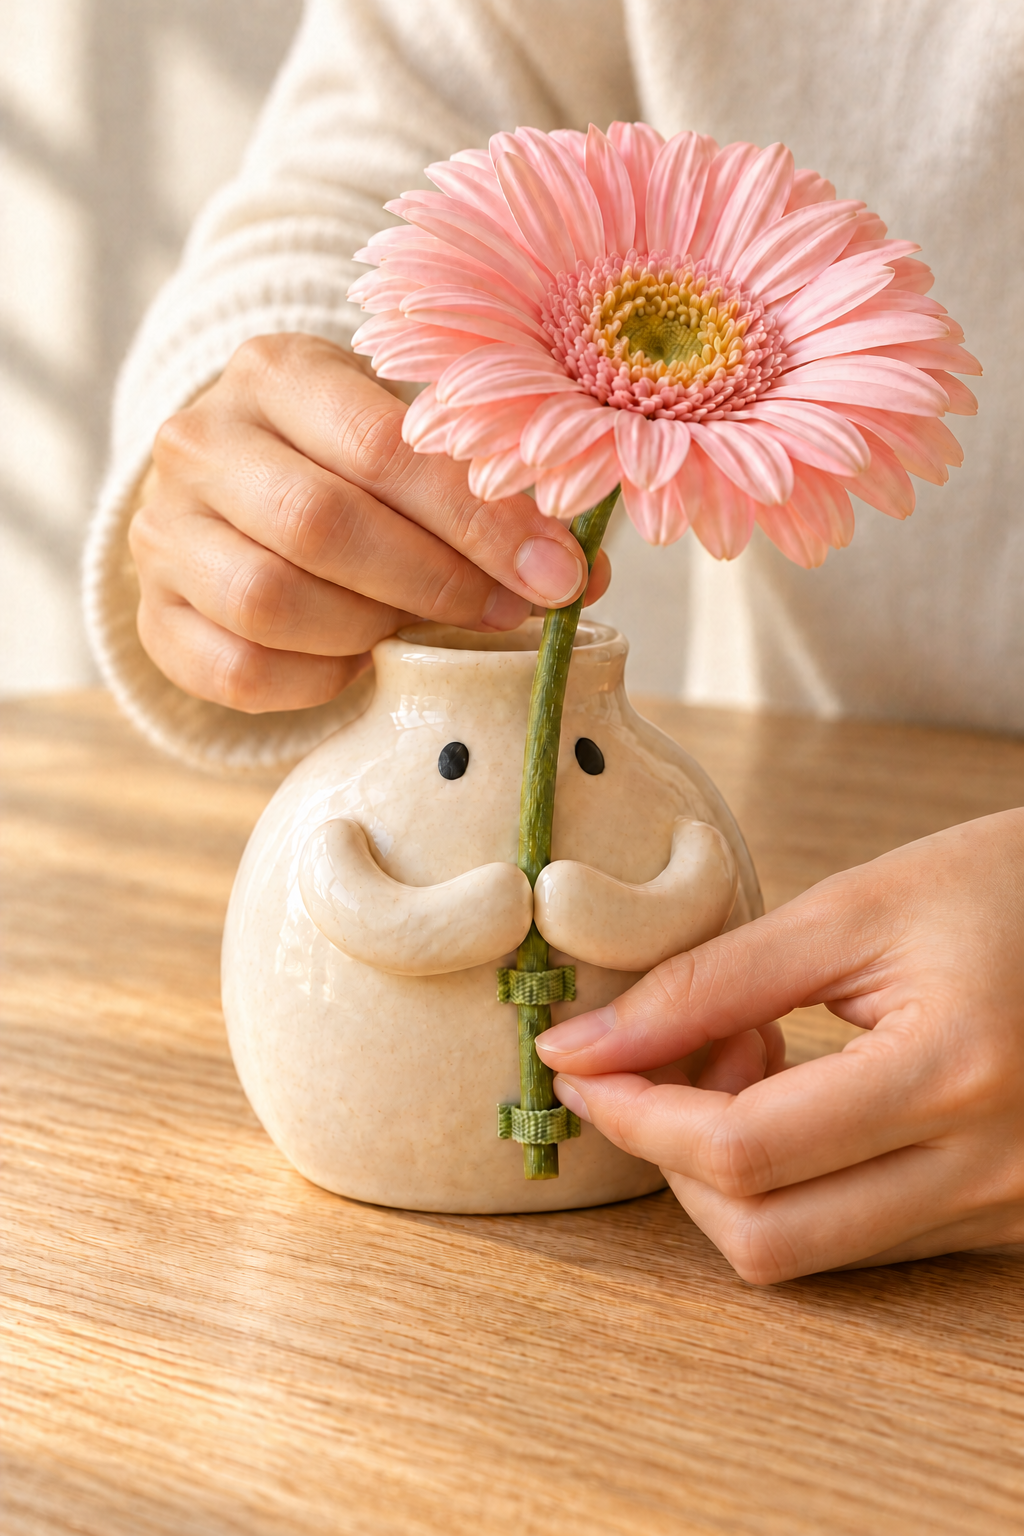
If the bloom needs adjusting, remove the flower and gently bend the upper stem, then slide it back into place. Keep both eyes visible beneath the petals and the bloom’s center above the vase’s base. If the stem slides through the keepers, remove it and remake the loops with a tighter bridge; do not squeeze the brittle clay hands to create grip.
Stand the piece on a level surface and gently check for rocking, sliding, or tipping. If anything shifts, revise the flower position or keeper fit before display. Pick the finished piece up by its vase body, never by the bloom or arms.
Small Details That Improve the Hug
Check the arm paint against the vase in daylight before finishing both arms. Aim for a similar color and sheen so the arms look like part of the vase. A slight difference in texture is part of the handmade charm.
Keep the hands rounded and simple. Position them close to the stem so the hug reads clearly, without adding thumbs or finger grooves. If a dry arm develops a deep crack, replace it before attachment.
Change the Color Without Losing the Character
A pale yellow or dusty peach gerbera can use the same external-stem structure. Keep a visible flower center and one bloom so the pose remains readable. If the new stem is thicker, reshape the hand gap and keeper tunnels to fit it rather than scaling the printed guide alone.
Give It a Quiet Place to Sit
Set the vase on a desk or shelf away from an edge, splashes, and strong direct sunlight. Dust gently with a soft brush. Keep the opening dry and avoid filling the vase with water; the decoration is designed around an artificial flower and exterior attachments.
A little open space around the bloom lets the oversized flower and small hugging hands tell the whole story.