*This post may contain affiliate links for which I earn commissions.*
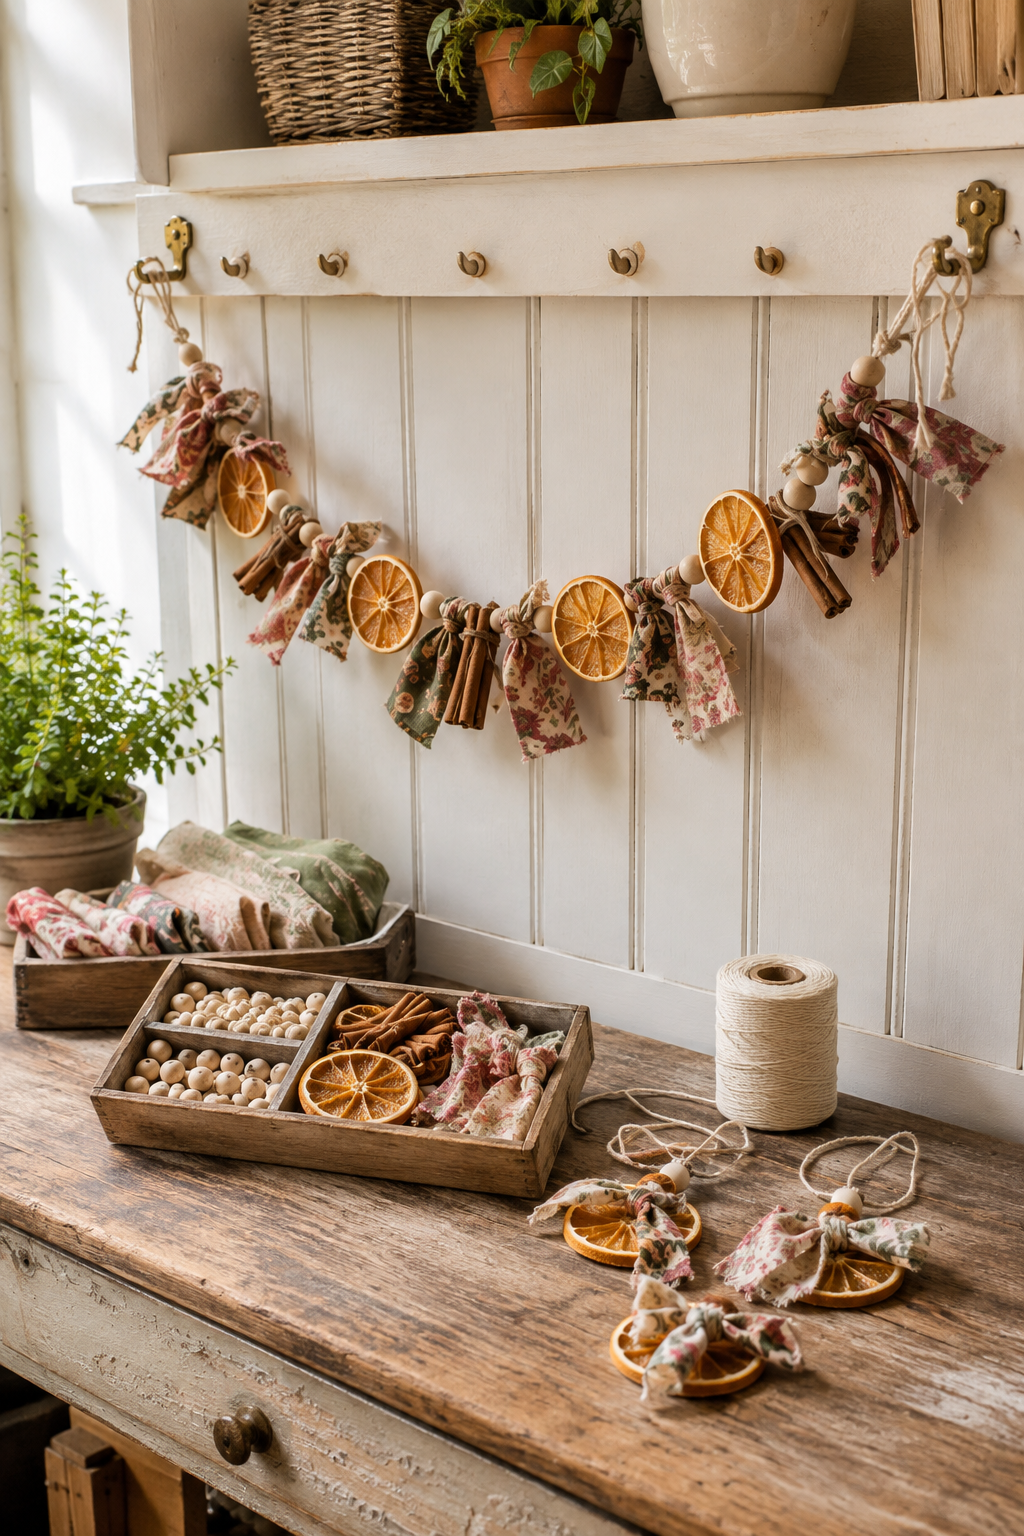
Image created with AI. This image serves as visual inspiration for the project below.
Amber orange slices, faded florals, and pale wood beads give this handmade garland a soft, collected feel. Small cinnamon bundles bring a little depth between the citrus rounds, while loose fabric tails keep the arrangement from looking too uniform.
Make a short strand for a peg rail or adapt the length for a shelf. The project uses simple threading and tying, with two-point thread attachments that help protect the brittle citrus. Step-by-step photos below show how to attach the orange slices, secure the cinnamon bundles, tie the fabric, and finish the hanging loops.
What You’re Making
You’ll make a lightweight indoor garland on a continuous cotton cord. Wood beads sit on the main strand; orange slices hang from short lengths of thread secured at two points, while fabric strips and cinnamon bundles are tied around the cord.
The fine thread lets you support the fruit without forcing thick cord through brittle citrus. The result can echo the image’s shallow, softly draped curve without trying to reproduce every small detail exactly.
Materials and Supplies
Materials
For a small garland with four orange slices, use these quantities as a starting point and adjust after measuring your display space.
- Dried orange slices: four intact rounds, plus a few spares, roughly 2–3 inches across.
- Floral cotton fabric scraps: enough to cut about 12 strips, roughly 1–1½ inches wide and 8–10 inches long, in muted rose, cream, and green prints.
- Unfinished wood beads: about 12 pale round beads, roughly ½–¾ inch across, with holes wider than your main cord.
- Cinnamon sticks: six to nine sticks, roughly 3–4 inches long, for three small bundles.
- Cotton cord: natural-colored, roughly 2 mm thick, for the main strand and bundle ties.
- Cotton sewing thread: sturdy thread in a natural color for attaching the orange slices.
Tools
- Fabric scissors.
- Tape measure.
- Fine sewing needle with an eye that accepts your thread.
- Removable painter’s tape.
Before You Start
Measure the drape
Measure along the curve you want the garland to follow, rather than straight across the gap between its supports. Allow about 12 extra inches of main cord at each end for loops and adjustments. Keep additional cord for tying the cinnamon bundles.
The suggested quantities suit a modest strand. For a longer display, repeat the arrangement rather than stretching the same four slices across a much larger span.
Check your components
Use fully dried orange slices with intact flesh near the upper rind. Reject pieces that feel damp, show mold, or crumble when handled gently. If you’re drying your own fruit, prepare it completely before starting the garland; this tutorial begins with fully dried slices.
Test a bead on the cord before cutting everything to length. It should slide without being forced. Pair two or three similarly sized cinnamon sticks for each bundle, and choose fabric scraps large enough to cut usable strips.
Step-by-Step Tutorial
1. Lay out the rhythm of the garland
Cut the main cord to your measured length, including the end allowances. Lay it on the table and use small pieces of painter’s tape to mark where you want the decorated section to begin and end.
Arrange the four orange slices beneath it. Distribute three cinnamon bundles between the slices, then place beads and fabric strips in the remaining gaps. Leave enough space for each orange to show its round outline. A little variation looks more natural than a tightly packed repeating pattern.
Cut the fabric strips. Pull away loose edge threads and trim any long strands that could tangle with the fruit attachments.
2. Thread the wood beads first
Wrap a tiny piece of painter’s tape tightly around one cord tip to make a temporary threading point. Pass that tip through every bead, sliding the beads toward their planned positions. Remove the tape afterward.
Keep both cord ends accessible and don’t tie the hanging loops yet. The beads can still move at this stage; the tied fabric and other attachments will help divide them into small groups later.
3. Give each orange a two-point attachment
Set one slice flat on the table. With the fine needle, gently make two small holes through a sturdy part of the dried flesh just inside the upper rind, one on either side of the top center. Leave enough dried fruit between each hole and the rind so the thread won’t tear through the edge. If the flesh splits or crumbles, replace the slice rather than enlarging the damage.
Cut two short lengths of thread. Pass one through each hole, leaving two free ends at each point. Bring the two thread ends from the first hole around the main cord and tie them securely with a square knot. Repeat with the second hole, leaving a little space between the two attachment points along the cord.
Keep both attachments short and similar in length so the slice hangs just beneath the strand. Tighten the knots around the cord without pulling the thread hard against the fruit. The two separated supports help the slice face forward, although a lightweight natural slice may still turn slightly.
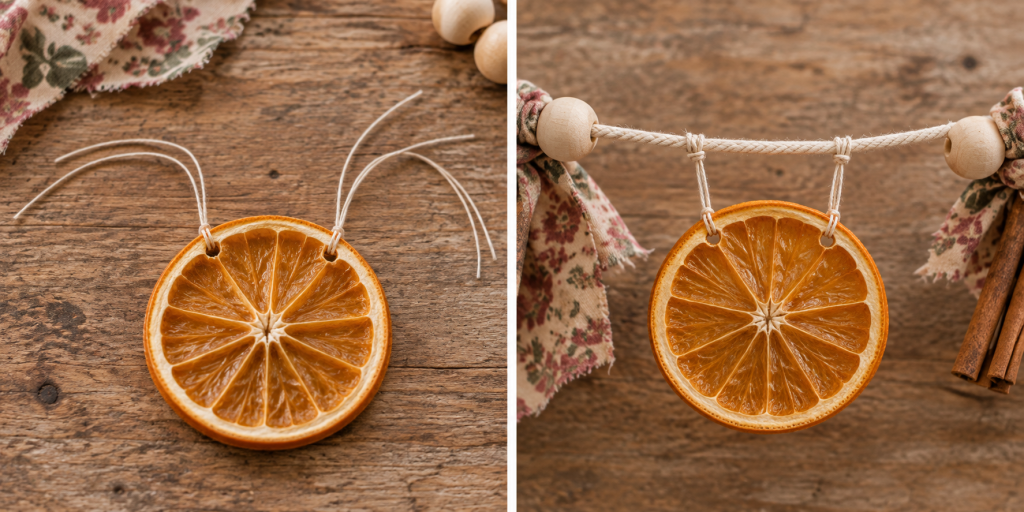
Lift the cord gently to check the slice before adding the others. Adjust the attachment positions if it tilts, then repeat for the remaining rounds. Don’t use the orange attachments to pull the main cord taut.
4. Wrap and tie the cinnamon bundles
Gather two or three cinnamon sticks. Cut a piece of cord long enough to wrap around their middle several times and leave two usable tying tails. Wrap snugly and tie a square knot around the sticks.
Use the same cord tails to tie the bundle directly to the main strand, keeping the connection short so the bundle doesn’t swing far below the oranges. Gently tug each stick to check that it stays inside the wrapping; rewrap a loose bundle before continuing.
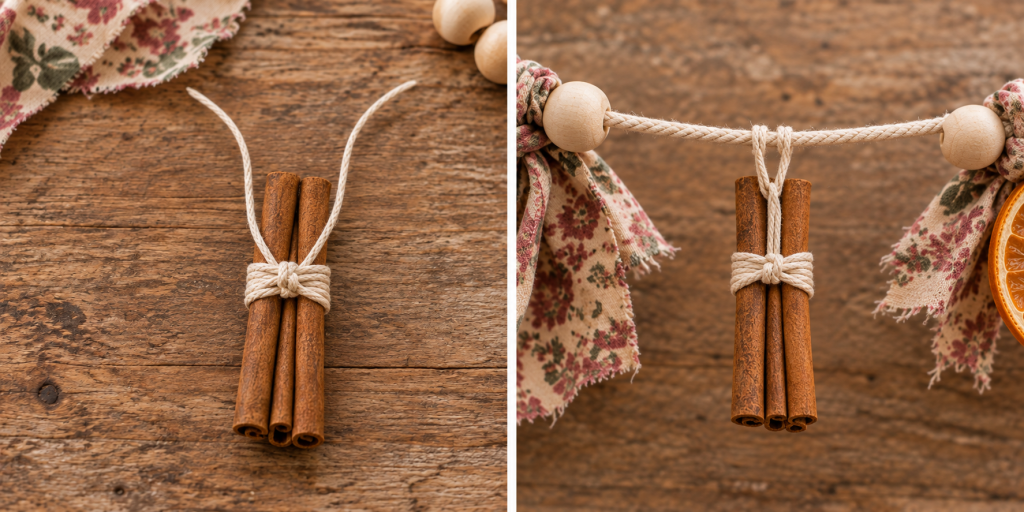
Attach the three bundles in their planned gaps. The cord wrapping should hold each bundle securely without the need for glue.
5. Tie the floral fabric between the components
Fold a strip in half. Place its folded loop behind the main cord, bring the two loose ends through that loop, and pull gently to make a lark’s head knot. The two tails should fall below the strand.
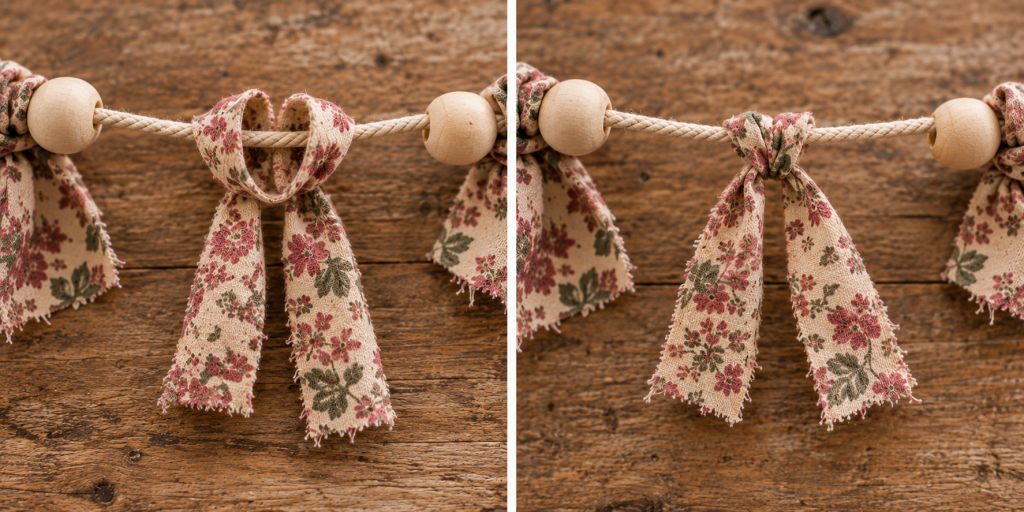
Add the remaining strips in small groups around the oranges and cinnamon. Slide adjacent beads into place as you work. Fabric knots on either side of a bead group can help keep the beads in place without requiring a bulky stopper knot.
Keep the knots off the orange threads so they don’t pinch the fruit attachments. Trim the fabric ends only after checking the overall balance.
6. Finish the ends and check the hanging curve
Fold one cord end back to form a loop sized for your existing support. Tie the doubled cord in an overhand knot, leaving a tail beyond the knot. Repeat at the other end.
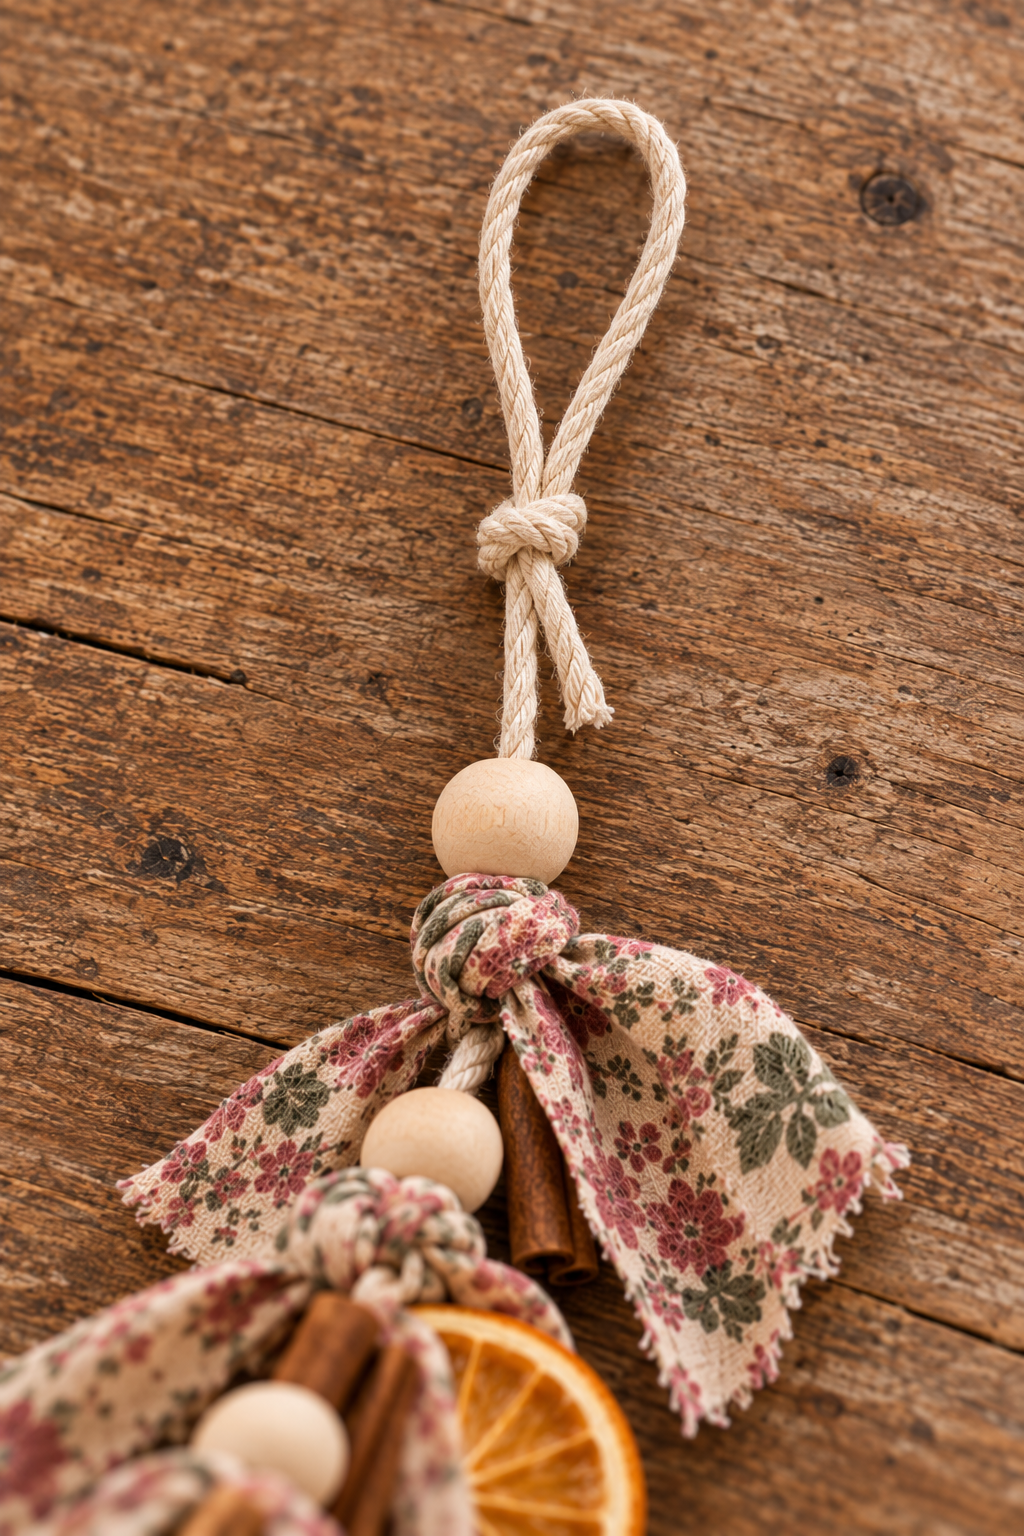
Hang the garland briefly from secure supports, following the instructions for your hooks or hanging hardware. Keep one hand under the garland while you make any final adjustments. Check for slipping bundles, moving bead groups, or fruit beginning to tear before leaving it displayed.
Adjust the loops to create a relaxed curve. If everything gathers at the lowest point, take the garland down and tighten or reposition the fabric knots that separate the groups. Trim excess cord only when the spacing is settled.
Small Fixes for a Neater Strand
If an orange keeps turning, first check whether its two attachments have slid together. Separate them and retie loose knots. A thin slice may naturally stay slightly curled; don’t try to flatten it by tightening the thread.
If your cord is too thick for the beads, change the cord or select larger-hole beads. Forcing it through can split a bead or fray the strand.
A broken orange can be replaced individually. Cut its fine threads, support the neighboring pieces, and attach a spare without dismantling the whole garland.
Change the Mood with the Fabric
For a quiet fall version, use mostly cream and sage florals. For Christmas, bring more muted rose into the fabric mix while keeping the pale beads and citrus as the lighter elements.
A shorter strand can use fewer slices and bundles. Keep the fabric tails in scale with the orange slices so they don’t overwhelm the citrus and make the garland look like a row of tassels.
Hang It Where the Details Can Show
A peg rail or the front of a dry indoor shelf gives the fruit a simple backdrop. Keep the garland clear of open flames, hot fireplace surfaces, cooking heat, steam, and persistent moisture.
Handle it by the main cord when moving it. For storage, lay it loosely in a shallow box without placing weight on the slices. Inspect the natural materials before reuse and discard anything damp, moldy, or pest-damaged.
With its faded florals, warm citrus, and small handmade variations, the finished garland feels especially at home against worn wood, painted paneling, and other relaxed holiday layers.